Another great price action pattern, that often leads to very favorable risk to reward scenarios, is the bullish harami candlestick pattern. In this addition to my price action course, I’m going to show you how to correctly identify and trade the bullish harami pattern.
This pattern is only a moderately strong signal – not in the same strength category as something like a hammer or engulfing pattern.
I prefer to trade candlestick signals in addition to my main trading system, using my trading system to qualify the candlestick signals that I may be considering. Since the bullish harami is only a moderately strong reversal signal, I don’t recommend pure price action trading with this signal.
What is a Bullish Harami Candlestick Pattern?
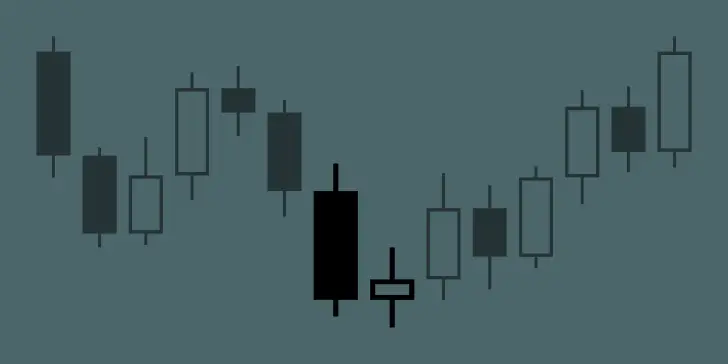
The bullish harami candlestick pattern is, as mentioned earlier, a moderately strong bullish reversal signal. This pattern starts with a relatively large bearish candle followed by a relatively small bullish or bearish candle. The real body of the 2nd candle must be inside of the real body of the 1st, bearish candle, and must not be more than 25% of the 1st, bearish candle.
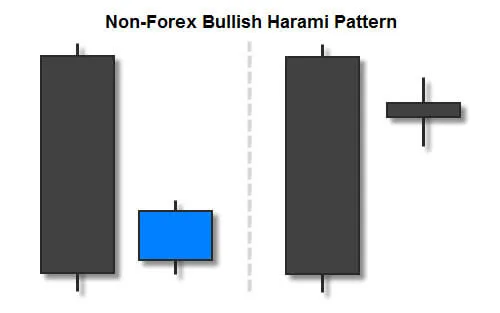
In most markets, the 2nd candlestick in the pattern can be bearish or bullish, as long as its real body is inside of the real body of the 1st candle, and its size is not more than 25% of the 1st candle (see the image above).
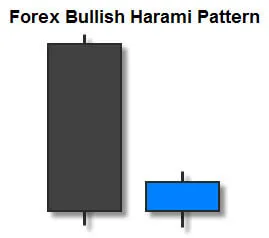
In the Forex market, however, the 2nd candle in the pattern will almost always open near the close of the 1st candle, and will always be a bullish candle (because another bearish candle would mean no inside bar).
I’ve said it over and over again in these articles, but it’s worth repeating: the context in which you trade these candlestick patterns is of crucial importance. A true bullish harami pattern only comes after a downward trend in price. Never trade these signals from consolidating market prices.
Trading the Bullish Harami Candlestick Pattern
In the image below, you can see a bullish harami candlestick pattern followed by a short rally in price. The second candle in this particular bullish harami pattern forms a hammer signal.
The new upward movement is short-lived, but you still could have earned some decent profits on this one, especially if you had used the 50% entry that I like to use on hammer and shooting star signals.
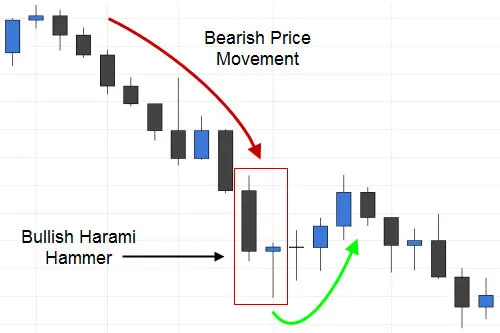
If you would have used the 50% entry based on the hammer candlestick in the bullish harami pattern above, you could have made about 3x your risk at full leverage. I personally would have closed half of my position once it reached the 1:1 ratio mark (or 1% for me, since I only risk 1% per trade). This way, even if the trade goes against me and triggers my stop loss after this point, I will still only break even.
Example: You enter the trade (pictured above) with 4 lots at the traditional entry (when the new candle breaks the high of the smaller, second candle of the harami pattern). You’re risking 1% of your total trading account. Price starts to move in your favor, and soon you’re up 1%. At this point, you close 2 lots, and leave the other 2 lots in the market.
You are now in a bulletproof trade, because even if you never take profits on the remaining 2 lots, and your stop loss is triggered, you still would not lose more than you’ve already made on the trade. In other words, you would break even.
This next trade is similar to the last in a couple of ways. The retracement after the bullish harami candlestick pattern was short-lived, and the second candlestick in this pattern is a hammer signal as well. We’ll use this example to go over some possible entries for this useful candlestick pattern.
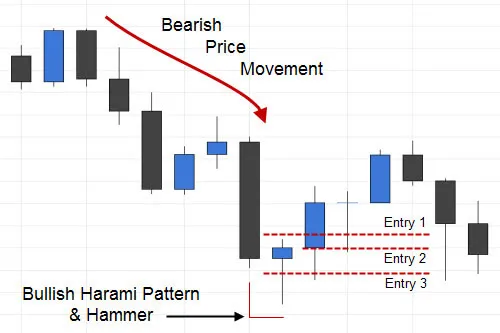
Entry number 1 is the traditional entry for this pattern. Using this entry, you enter the market when the next candlestick after the harami pattern breaks the high of the smaller, second candlestick in the pattern. In the trade above, that would have been when the new candlestick breaks the high of our hammer signal.
Entry number 2 is simply an entry at the open of the next candlestick. It is more aggressive because the bullish harami signal’s relevance is not confirmed by price before you enter the market. It is entirely possible that price could immediately head for your stop loss. On trades where this entry works out, you will get a better risk to reward ratio than with entry number 1.
Entry number 3 is an entry when the new candlestick comes back to the 50% mark of the hammer candlestick that appears in our harami signal above. It is considered to be aggressive by some traders. I don’t consider it to be aggressive because it gives you a much better risk to reward ratio when it works out. This particular 50% entry (which is 50% of the entire range [high to low] of the candlestick) is only used on pinbars – like the hammer, in this case, or shooting star signals.
Note: The only downside to entry number 3 is that the 50% entry will sometimes keep you out of good reversal trades that simply never return to the 50% mark of your hammer or shooting star.
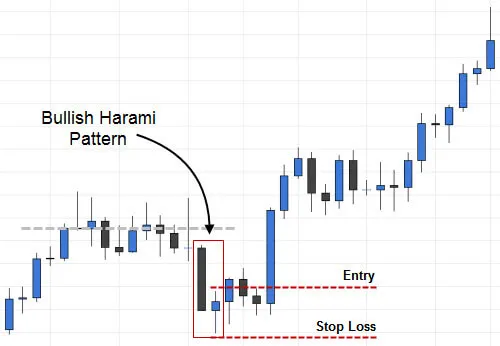
The bullish harami candlestick pattern pictured above is an example of this candlestick pattern that worked out very well. This particular harami pattern signaled the end of a retracement to the overall upward trend. I chose to include this example because many price action traders would not have taken this trade, and they would have missed out on some serious profits.
The two candles that formed the bullish harami signal look fine, however, this pattern did not come after a very good downward trend in price. I probably would have taken this trade, however, because of the obvious resistance level that started the small downward retracement in price.
One of the benefits of trading harami candlestick patterns is that the potential risk to reward ratio is usually pretty good on these trades. In the example above, even using the traditional entry, this trade would have gone for at least 1:1 risk to reward if price returned anywhere near the previous resistance level.
Note: Your stop loss should be placed under the lowest low in the series of candles that formed your signal. In the example above, you would have put your stop loss under the low of the second, bullish candlestick in the pattern.
Final Thoughts
Candlestick patterns are great short term signals, but there is never a guarantee that price will continue in any direction for very long. Bullish harami candlestick patterns typically make for good risk to reward ratios, making them profitable even on short-lived reversals.
The context in which these candlestick signals are taken is very important. A true bullish harami candlestick pattern only comes after a downward trend in price. Never trade any candlestick signals during periods of price consolidation.
As always, taking advantage of the best entries for each particular trade and using wise money management skills will go a long way toward your continued success with these candlestick signals.
Steve Nison recommends combining Japanese candlestick trading with western technical indicators to qualify the best trades. I’ve personally used Nison’s candlestick techniques in combination the MACD and RSI indicators with great success.
The bullish harami candlestick pattern is often overlooked by price action traders because it is only a moderately strong signal. However, the favorable risk to reward scenarios that harami signals present make them worth learning. Be sure to demo trade this pattern until your are consistently profitable, and have fun trading!

