I’m updating this guide because the bearish engulfing candlestick pattern has become, by far, my favorite price action signal over the years. I’ve learned a lot about trading it since I first published this back in 2012, and I wanted to update it to reflect my most current information and experience.
I first started trading price action patterns in 2011, and like a lot of price action traders, I immediately gravitated toward the pinbars (hammer and shooting star). In recent years, I’ve actually found the engulfing patterns to be much more useful for a few reasons.
First, contrary to popular belief, good engulfing patterns are stronger – second only to engulfing evening star and morning star patterns. Keep in mind that I said, “good engulfing patterns are stronger.”
I’ll go over what makes a good engulfing pattern later.
Second, good engulfing patterns occur much more often than good pinbars. This is more important than you might think, especially if you combine price action with other techniques like I do.
This only matters if the setups are good, but all things being equal, more is better.
Third, one of the proprietary techniques that I use to confirm a good price action pattern (which I will discuss below) is met by the engulfing pattern itself. Whereas other strong candlestick patterns don’t necessarily meet this rule on their own.
So why do I prefer the bearish engulfing candlestick pattern? This is a personal preference. I typically have more success with sell trades, so I always prefer the bearish version of any price action pattern.
Note: I know this because I keep a trading journal which allows me to analyze my trades at the end of every month. If you’re serious about your trading, you should do this too.
In this guide, I’m going to show you how to correctly identify and trade the bearish engulfing candlestick pattern. Some of the techniques that I will discuss below are well known. Others I’m sure you will not have seen anywhere else.
Most of the examples are based on the Forex market, but these techniques work just as well in other markets.
Just in case you’re completely new to this pattern, we’ll start with the basics.
What is a Bearish Engulfing Candlestick Pattern?
A standard bearish engulfing candlestick pattern is simply a candlestick that opens at or above the close of the previous candle (almost guaranteed in Forex) and then closes below the open of the same (previous) candle.
Notice we’re talking about the real bodies here (see the image below).
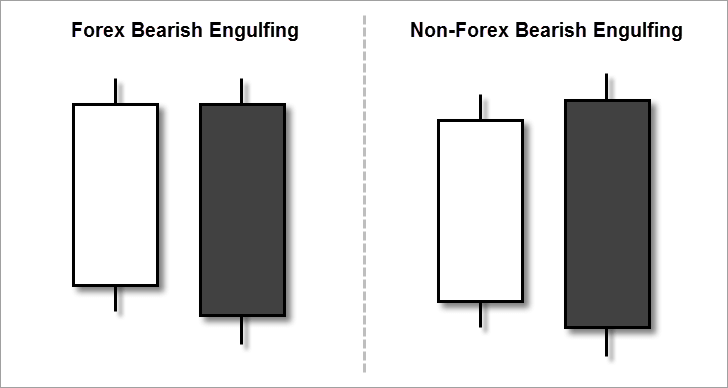
Note: Some traders consider a bearish engulfing pattern to be one in which the total range (high to low) of the bearish candle also engulfs the total range of the previous, bullish candle. Others don’t consider the real bodies at all.
I haven’t found this to be useful in my own trading. For the purpose of this guide, we will be discussing the price action of the real bodies (open to close) of the candlesticks involved in creating this pattern – not the total range of the candles.
If you’re trading this candlestick pattern in any other market than Forex, you will likely be dealing with gaps from candle to candle. In such cases, the engulfing candlestick should gap up and then close below as seen in the picture above (under Non-Forex Bearish Engulfing).
Note: Gaps occassionally occur in the Forex market as well. Sometimes a small gap up is followed by a bearish engulfing candlestick.
As long as all of the other requirements are met, such patterns should be considered valid bearish engulfing signals. In fact, these rare patterns can be particularly strong due to the added closing gap technical pattern.
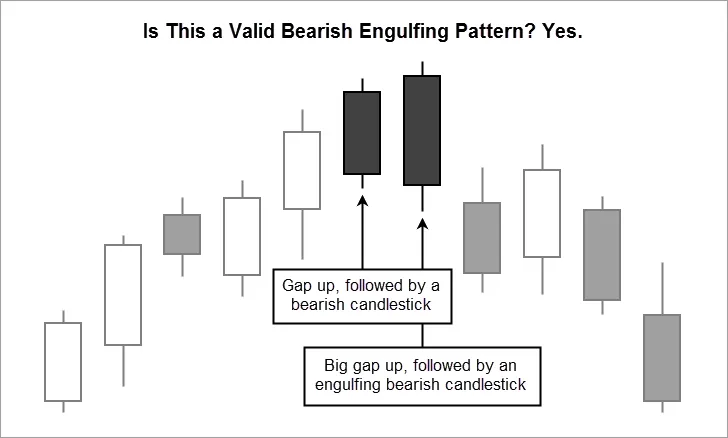
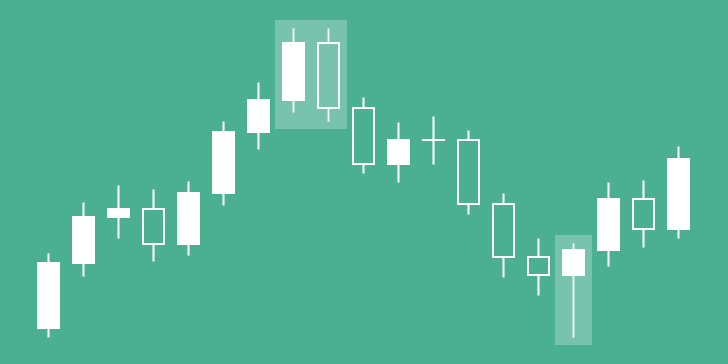
Also, depending on how much gapping occurs in the market (non-Forex) that you’re trading, it’s possible to see a valid bearish engulfing pattern that consists of two bearish candlesticks – in which the second bearish candlestick has gapped up and engulfed the first (see the image below).
Lastly, this pattern is considered to be a strong bearish reversal signal. As such, a true bearish engulfing pattern will only come after a bullish movement in price (consecutive higher highs). Never trade this pattern in a period of market consolidation (flat/sideways price action).
What Makes a Good Bearish Engulfing Pattern?
Over the years that I’ve been trading this pattern, I’ve picked up or developed a few filters that help to qualify good bearish engulfing patterns. Like many of the techniques I’m discussing in this guide, these filters can be applied to other price action patterns as well.
These filters have drastically increased my strike rate with these patterns, but the tradeoff is that you will get fewer qualified trades (quality over quantity).
Confirmation Close
The first filter is the confirmation close. Earlier, I mentioned that one of my proprietary filters is necessarily built-in to the bearish engulfing pattern. This is what I was referring to.
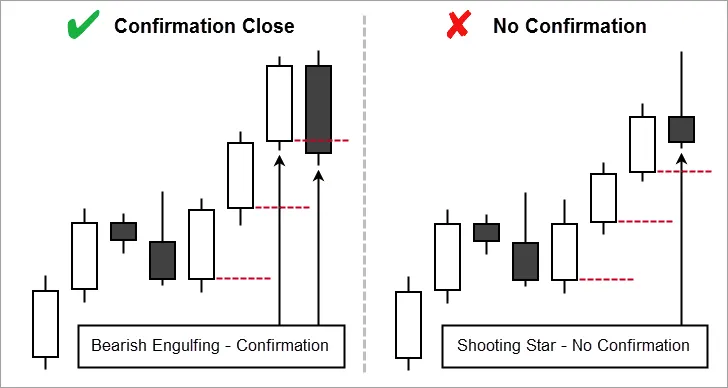
The confirmation close is simply one additional clue that the trend is likely to reverse. It occurs, in the case of a bearish engulfing pattern, when the second candlestick in the pattern closes below the real body of the first candlestick (see the image above).
Note: This works because the first lower real body in an uptrend is often a signal of an upcoming retracement or reversal – regardless of whether or not a price action pattern is involved.
As you can see, the engulfing pattern has it’s own confirmation candle built right in. In the case of the shooting star, I would still be waiting for a confirmation down because it did not close below the real body of the previous candle.
Close Relative to Range
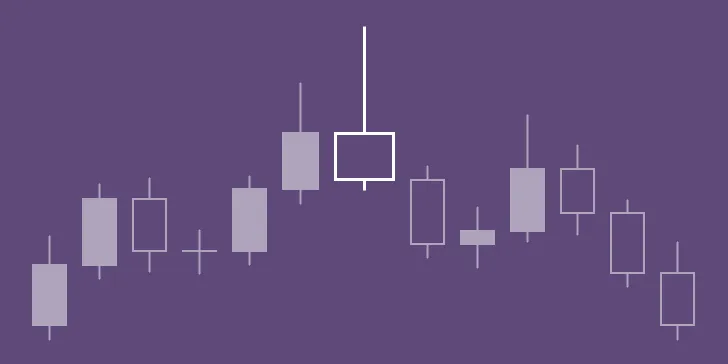
The next thing you should consider when trading the bearish engulfing candlestick pattern is whether or not the engulfing candlestick closes within the bottom 1/3rd of its range (see the image below).
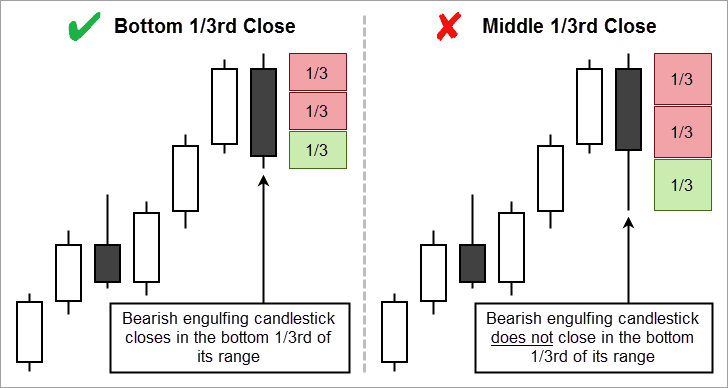
The idea behind this filter is that a long lower wick (sometimes called a shadow) is a technical indicator that can represent a bullish rejection of price.
The fact that price has already recently been lower but bounced back up, which could mean that the market is rejecting prices below the close of the pattern, lowers the odds that bearish strength will follow through driving prices down.
Also, in general, bearish candlesticks that close near the bottom of their range are considered to be more bearish. The closer the close is to the bottom of the range the better.
Note: When using this filter with other candlestick patterns, remember that it should apply to the signal candlestick (or the final candlestick in a multi-candlestick pattern) as well as the confirmation candlestick.
Relative Size of Pattern
The size of the bearish engulfing pattern, relative to the size of the candlesticks that came before it, is also significant. If you’ve been trading price action for a while, you’ve probably heard about this filter before.
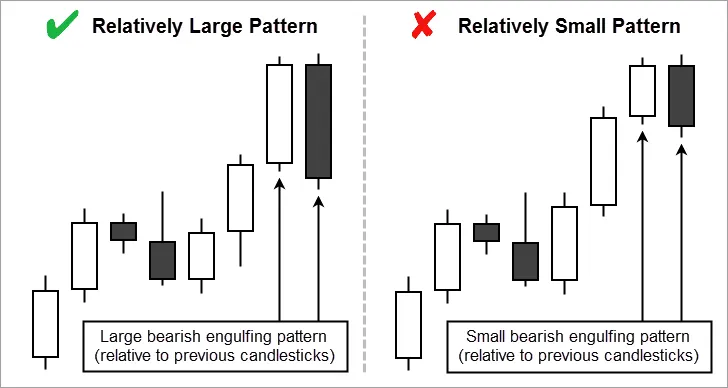
Basically, larger candlesticks are more significant, so price action patterns composed of larger candlesticks are more significant.
Also, the further back you have to count to find other candlesticks of similar size, the more significant the candlestick is. For instance, if your bearish engulfing pattern is larger than the last twenty candlesticks that came before it, that pattern is more likely to be significant.
Note: You can still trade bearish engulfing patterns that are slightly smaller than previous candlesticks. However, if you assign scores to your trades in your trading journal, you may want to take a point away for the lower strength of the pattern.
You basically want to avoid taking price action patterns that are significantly smaller than previous candlesticks. In such cases, the market is telling you that the pattern is not important.
The relative size filter applies to both candlesticks in the bearish engulfing pattern as well. In my experience, when these patterns are formed by engulfing a single candlestick which has a small real body, they are not significant enough to trade.
Trading the Bearish Engulfing Candlestick Pattern
Assuming your bearish engulfing candlestick pattern has passed all of the filters above, it’s time to actually place and manage your trade. Of course, you’ll want to backtest and demo trade these techniques before trying them in your live account.
Entry
The first thing I want to go over is where you should actually place your entry when trading the bearish engulfing candlestick pattern. There are several techniques that you could use, but I only recommend using the two standard entries and my 50% entry.
Most of the time, you will want to use one of the standard entries. The 50% entry is used only in certain situations which I will explain in detail below.
Standard Entries
The first standard entry technique for the bearish engulfing candlestick pattern is to simply place a sell order at the open of the next candlestick (see the image below – left). Of the two standard entries, this is my preferred method to use because it creates a more favorable reward to risk scenario.
If you use the MetaTrader 4 platform, you can use this handy candlestick timer to help you time your entries with this first method.
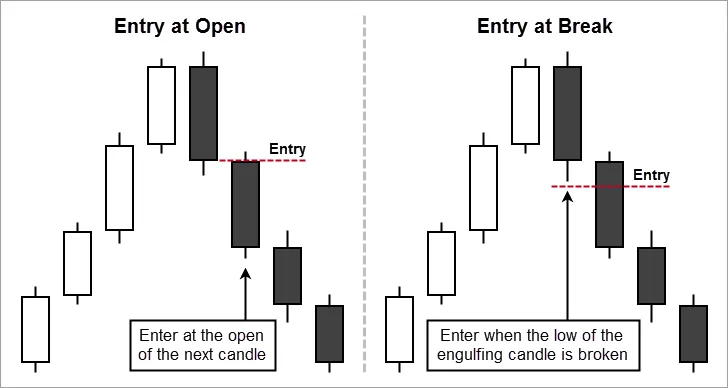
The next standard entry method is to wait for a break of the low of the engulfing candlestick. In the Forex market, your entry would be 1 pip below the low (see the image above – right).
Note: Depending on the size of the wick, entering at the break of the low of the engulfing candle could lead to poor risk to reward.
Whenever possible, you should use a sell stop order to enter the market while using the second standard entry. This ensures that you will get an accurate entry, and it keeps you from being forced to stare at your screen, waiting for a break of the low.
The 50% Entry
This next entry should only be used when the standard entries are likely to result in a poor reward to risk scenario (which I will go over in more detail later on).
A tall upper wick or a tall engulfing candlestick means you would have a larger than usual risk (in pips or points).
A larger risk means you are less likely to hit your profit target because some of the reversal that you were hoping for has already been taken up by the tall wick or candle. It also means that your reward must be larger (in pips or points), which further decreases the odds of hitting your target.
Basically, both cases create a poor reward to risk scenario.
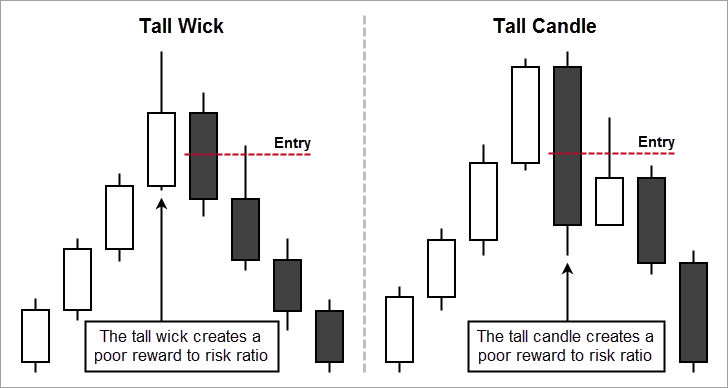
The solution is to seek a price improvement. I do this with the bearish engulfing candlestick pattern by waiting for the price to pull back to 50% of the total range of the engulfing candlestick (see the image above).
If I do get a pullback, I end up with a much better entry, and the odds of hitting my full take profit go way up.
Note: Occasionally, when using this method, you will miss some trades because the price will not always pull back to your entry.
I’m okay with that because I only want to take high quality trades that provide a real edge in the market (quality over quantity).
Whenever possible, you should use a sell limit order to execute the 50% entry. Again, this will help you get an accurate entry, and keep you from being forced to stare at your screen waiting for a pullback.
Stop Loss
Next, we need to talk about where to place your stop loss while trading the bearish engulfing candlestick pattern, moving your stop loss to a breakeven point (optional), and when you should do that.
You always want to place your stop loss at the nearest area where you know you’re wrong about the pattern if the price reaches it. In a bearish pattern, you know you’re wrong if price makes a new high.
In the Forex market, you pay the spread when exiting a sell trade, so you should add the spread to your stop loss. If you don’t, you could be stopped out of your trade before price actually breaks the high.
A good rule of thumb is to place your stop loss 5 pips above the high of your pattern (see the image below). This allows enough room for your average spread plus a few pips above the high in case the spread spikes slightly.
Note: On the Daily chart, you should place your stop 5 – 10 pips above the high. Basically, if you can see a gap between the high and your stop loss, that should be about 5 – 10 pips, which makes trading on the Daily chart a bit easier.
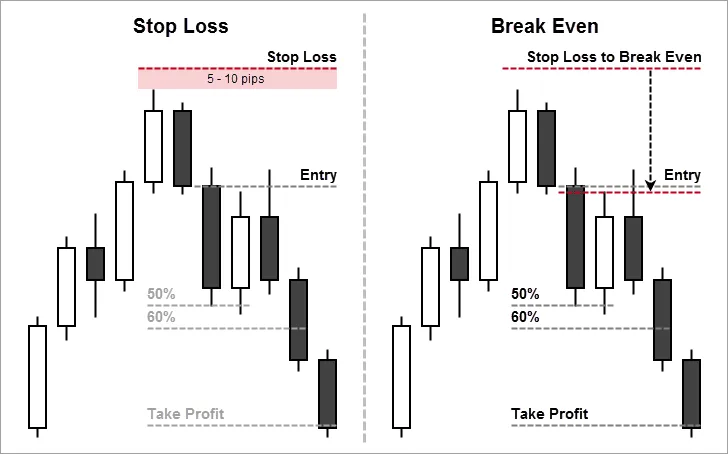
After price has moved down in your favor a bit, you can move your stop loss to break even on the trade, just in case it doesn’t follow through all the way to your take profit. This technique is optional, although I personally use it and recommend it.
I personally move my stop losses to breakeven plus 2 – 3 pips (depending on the pair) to cover the spread after price reaches 60% of my intended profit target.
In other words, if my profit target is 100 pips, I move my stop loss to breakeven plus 2 – 3 pips after the trade has gone 60 pips in my favor.
Why 60% and not 50% (or 1:1 reward to risk)? Often price retraces back to the entry or further once the 50% (or 1:1) target has been reached (see the image above).
Note: The market makers do this to increase their positions before continuing the move down because they know many traders move their stops to breakeven at 1:1.
This is a technique that I picked up from Sterling at Day Trading Forex Live that has worked very well for me.
If you use the MetaTrader 4 platform, you can use this break even EA to automatically move your stop loss for you. That way you don’t have to sit in front of your computer screen waiting.
Take Profit
When trading price action patterns, I occasionally shoot for different profit targets, based on what kind of pattern I’m trading and the reward to risk scenario it provides. For instance, I usually target a 3:1 reward to risk ratio when trading the harami patterns.
However, when trading most other price action patterns, including the bearish engulfing candlestick pattern, I target a 2:1 reward to risk ratio.
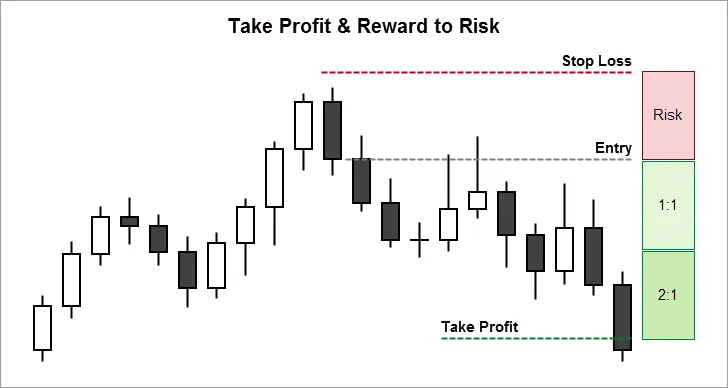
What this means is that, if I’m risking 50 pips, I place my take profit 100 pips away from my entry (see the image above). Over the years, this has worked out very well for me, especially with the bearish engulfing pattern.
Note: Some trading systems don’t use set take profit levels. Instead, they use a trailing stop in one form or another in an effort to catch as much of the trend or reversal as possible.
In my experience, I can target a 2:1 reward to risk ratio with the bearish engulfing pattern and achieve a high enough strike rate (by combining it with a good trading system or the additional techniques below) to achieve consistent profits over time.
Bonus: Combining Techniques
Those of you who have read any of the other posts in my free price action course, probably already know that I don’t trade price action alone. I’ve experienced much better and more consistent profits by combining price action patterns with other, complimentary trading strategies.
If you can’t use these price action patterns as entry triggers in an already profitable trading system, combining them with the techniques below is the next best thing.
Resistance Levels
You’ve probably heard before that combining price action with support and resistance can be very profitable. This is true, as long as you are choosing good levels to trade from.
When trading the bearish engulfing candlestick pattern, the idea is to look to the left of the chart for any previous structure that may act as resistance.
In order for a resistance level to be considered good, there should be a nice surge up into the level, as well as a nice bounce down away from the level. There also shouldn’t be any other competing higher highs in recent history.
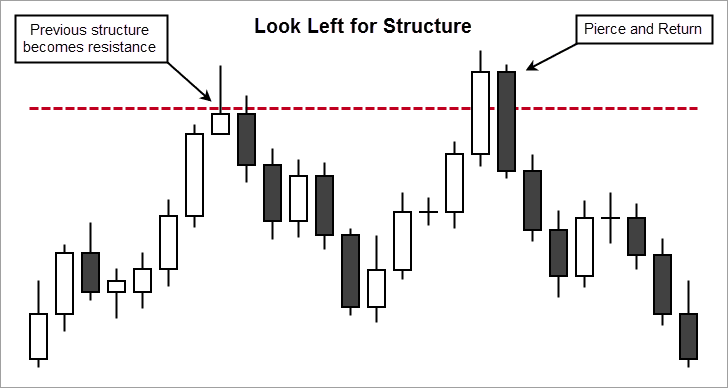
It helps to remember that support and resistance act more like zones than exact price levels. That being said, you should always draw support and resistance levels off of the real bodies of the candles – not the wicks (see the image above).
Once you’ve established a good resistance level, keep an eye out for bearish price action signals, like the bearish engulfing candlestick pattern, forming at or near the level.
I like to see at least a wick, from the candlesticks involved in the pattern, that touches the resistance level. The best setups, however, occur when the bearish engulfing pattern pierces the level and then returns because this is often a sign that the market makers are performing a stop run to set up a reversal (see the image above).
Note: For an in-depth guide on how to choose the best support and resistance levels, download my free eBook, How to Choose Better Support and Resistance Levels.
Bearish Divergence
I love trading divergence. The first trading system that worked for me used stochastic mini-divergence for setups, and I still seek out divergence patterns today. I especially love trading MACD divergence.
Bearish MACD divergence occurs during an uptrend when price is making higher highs while the MACD line or histogram (pictured below) is making lower highs.
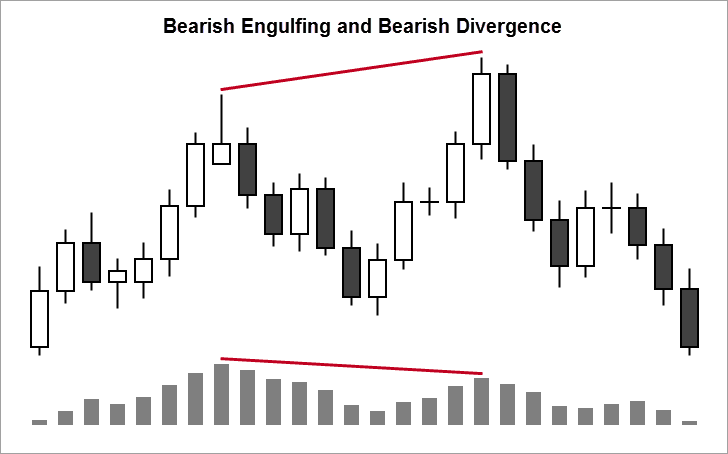
The idea is that the lower highs on the MACD line or histogram could be an early indicator that momentum is leaving the uptrend, which increases the odds of a reversal. When combined with a strong bearish reversal signal, like the bearish engulfing candlestick pattern, the odds of a reversal are even better.
In divergence setups like this, divergence is actually the key signal. The bearish engulfing candlestick pattern, or another bearish candlestick pattern, is only used to laser target your entry.
Note: In order to properly trade MACD divergence you must make sure you’re using the correct MACD indicator. The default indicator in MetaTrader 4 and many other platforms will not work.
Divergence trading strategies other than MACD divergence will also work well with most price action patterns. In fact, as an extra filter, many divergence traders like to wait for divergence to occur on multiple indicators before entering a trade.
Final Thoughts
Context is everything. A true bearish engulfing candlestick pattern is a strong reversal signal, which means it should never be traded from a consolidating market (choppy, sideways, or tight ranging). It should only be trading after an uptrend.
As long as the pattern passes the filters above, especially if you’re combining it with other qualifying strategies, you should be profitable.
The bearish engulfing candlestick pattern is generally considered to be stronger if one or more of the candlesticks involved in the pattern have tall upper wicks (especially when this creates an engulfed shooting star). Although the signal may be stronger, this usually creates a poor reward to risk scenario. However, I showed you how to deal with that.
Occasionally, multiple candlesticks are engulfed in the pattern. In such cases, it’s considered to be stronger (more candles engulfed = more strength).
Note: I mentioned earlier that bearish engulfing patterns formed by engulfing a single small real body candlestick have not been strong enough to trade in my experience.
However, patterns in which multiple small real body candlesticks are engulfed are acceptable if not stronger than usual.
The bearish engulfing pattern is considered to be stronger if the engulfing candlestick is very large, especially if the candlestick that is engulfed is also large. Again this creates a poor reward to risk scenario, but you know how to deal with that now.
Finally, when a bearish engulfing candlestick’s total range also engulfs the previous candlestick’s total range, it’s considered to be stronger than when only the real body is engulfed.
This guide is a product of over 40 hours of work and 10 years of trading experience. Do you agree that this is the ultimate bearish engulfing candlestick guide? Did you find it useful? Do you think I left anything out? Please leave your questions or comments below.

Thank you for very informative info
Thanks for reading and commenting. I’m glad you found it useful.
So good Chris! Love it..thank you so much for your hard work and information
Thanks for the kind words, Carolyn!
Thanks Chris. Well explained, and very helpful info. Appreciate you sharing your knowledge.
Thanks for the kind words, Paul. I’m happy that this guide was able to help you.
Thanks You Mr Chris. very appreciate you sharing your knowledge….thank you Sir…
mudrikat, thanks for commenting and reading. I’m glad you found this useful.
Excellent Depth Chris…thank you for sharing. – Derek
Thanks for reading and commenting, Derek. I’m glad you enjoyed it. Please share it with other traders if you know any.
This is incredibly in depth and well described. If you look at NVDA today, you can see your conditions met perfectly. Thank you.
Thanks for the kind words, Justin. You’re right. NVDA made a huge bearish engulfing pattern today with MACD divergence.
I hope it is not a bad question, can i use it for bullish engulfing scenario?
Thanks for the question, lee. I use these exact techniques to trade the bullish engulfing pattern as well. I just haven’t updated that article yet.
What will be the ideal time frame for this trade?
There’s no ideal time frame. I would just stay away from time frames lower than 15M. Candlestick trading doesn’t typically work well on anything lower than 15M.
The best way to figure out which time frames work best for you is to keep a detailed trading journal. Over time, you can get a good idea of which time frames are most profitable for you and which are causing you to lose money – as well as other useful information.
Really it’s a usefull site. i appreciate your all article. very nice and clear explain with example chart. thank you very much.
Thanks for the comment, Uzzal. I’m glad you’re finding the site useful.
Really good article
Thanks, Cedric! I’m glad you enjoyed it.
Hello Chris, I love the pictures very easy to understand, I always wanted to know how confirmation works. I have a few questions, I thought that for the 1/3 range/shadow that it means that the wick is not strong. So, I see both candles closes from previous candle, however the second picture doesn’t confirm as for as the wick, it’s much longer, in that case I don’t take the trade? I was watching a video, and the guy says that the body is what matters, not the wick.
My other question is let’s say the next candle is bearish, however it still doesn’t didn’t close from the previous candle, what happens after that?
Thanks.
Thanks for the comment, Harry. In the case of a bearish engulfing candlestick with lower wick that is too long, as you mentioned, you have 2 choices:
1) You can wait for another candle to close lower and also close in the lower 1/3rd of its range. Then wait for a pullback to the original entry point (or 50% point if it’s necessary).
2) You can just skip the setup, which is what I usually do.
Wicks definitely matter. The real bodies just matter more because they show you what price the market actually accepted during that candlestick’s period.
The wicks are still important because they show where the market tried to go but couldn’t hold. Therefore, a long lower wick (in the context of a bearish engulfing pattern) shows that the sellers tried to move the market lower but were unable to hold price lower. This could be a sign of weak bearish pressure, so at the very least, you hold off for further information.
Concerning your last question, I think you’re referring to a situation where the following candlestick still does not close in the bottom 1/3rd of the engulfing candlestick’s range (because of a long lower wick). In that case, you should probably just skip the setup.
That’s what I would do. The best setups are typical and clear cut, showing strong bearish indications. I hope that helps. Good questions, BTW!
Yeah true about the wick. I find it important when it comes to like a hanging man/shooting star/hammer/inverted hammer. When mentioned about the 50%, when it pullback it’s best to do a limit order instead of a buy/sell stop?
I used to think that once I entered in a trade that I enter in at down trend at sell, and I’m in profit for the moment but once it closes, another candle goes the other way around, but it fluctuates but in the end if it continue to go down, that’s what matters?
Most def, thank you! Do you have anything on multiframe analysis?
If you’re watching the pattern develop, you would use a limit order at the 50% mark. If you catch the pattern when price has already pulled back, and it already above the 50% mark, you may need to use a market order or stop order to get into the trade.
I learned early on that getting a good buy point could mean the difference between being a failed trader and being profitable. Sometimes you have to wait for a pullback to get a good buy point.
I haven’t written anything on multiple time frame analysis, although I’ve written about trading systems that I’ve tested which use multiple time frame analysis to measure “fractal energy” as part of their setups. Multiple time frame is another excellent qualifier to combine with these signals, though.
Multi-time frame analysis*
I have another question, I’m still new and learning about Forex. How come the daily chart and 4hr chart expires at the same time? And for me I find it easier to trade the 1hr but the thing is I don’t want to keep checking it every hour so I want to trade the 4hr. It’s no different right? I heard that all of those candles are consolidated into 1 candle for the 4 hr, daily, and so forth. I’m learning to instead of Short term scalping to go long term swing trading, more profits in the end.
Thanks.
Yeah. I’m sure scalping does work for some traders, but it always felt like picking up pennies in front of a bulldozer to me.
Once each day, all the standard time frames (up to and including the 1D) expire at the same time.
I understand not wanting to check your chart every hour. The ultimate is to check your charts once per day using a 1D chart and a good swing trading system. The problem with swing trading, especially in the Forex market, is that you just may not get enough setups to make the returns that you’re after.
The only words I could think of…”AWESOME”.
Thanks for the kind words, Faizal! I’m glad you enjoyed it.
Dear chris…amazing work and minutely describe everything. One question you just skipped the importance of volume here. I prefer a high volume in confimation candles.
Thanks for the kind words, Vimalesh, and good point! However, since this article is geared toward Forex trading, I purposely left out any talk of volume.
When trading the bearish engulfing pattern in other markets (where volume is accurate), you would like to see the engulfing candlestick form on higher than average volume (preferably on twice the volume of the previous candlestick).
A bearish candlestick on higher volume, especially twice the volume of the previous candle, is another great indicator that a larger bearish move is likely to occur.
Just read your post on bearish engulfing candles,and i must say you had done a pretty good job with your clear and precise explanation.Keep it up
Thanks! I’m glad you found this useful.
excellent description of the engulfing candle Chris.This can also work very well with a wavy trend as well from my experience.
Yes, Robby. As long as the retracement is large enough to qualify the pattern, trading with the overall trend is a great technique. Thanks for reading.
What are best time frames that gives genuine engulfing patterns
You can trade candlestick patterns on any time frame. I prefer not to trade on any time frames lower than 15 minutes, because lower than that, random market noise can distort the true direction of the market.
The spread also becomes a larger percentage of the risk that you must factor in. For me, given the techniques that I trade, the spread becomes too much of a factor and the signals are not significant enough to trade lower than 15 minutes.
That being said, the significance of any signal becomes stronger the higher the time frame. Engulfing patterns that occur on the monthly chart are stronger than those which occur on the weekly chart, which are stronger than those that occur on the daily chart, and so on…, with the significance being less and less as you go to lower and lower time frames.
The best time frame depends a lot on what works with your trading system and schedule. I trade the 15-minute to daily charts when I’m trading candlestick patterns. I personally have the freedom to watch the 15-minute charts in order to take every qualified setup.
You don’t want to miss setups. If you do, you’re really gambling at that point – not trading the edge that your system gives you. With that in mind, if you can’t watch the 15-minute charts like you should, maybe you should be trading the 4-hour or daily charts. I hope that helps. Good luck!
Thanks for Bearish Engulfing Pattern in details.
Thanks for reading.
How can you enter at 50% if the candle hasn’t closed yet? Doesn’t that mean it might not be engulfing the previous candle?
I didn’t say to enter before the engulfing candlestick closed. The idea is to wait for a pullback (by one of the following candles – preferably the very next candle) to the 50% mark of the total range of the engulfing candle during certain situations.
You would typically only use this technique if the trade would otherwise be a poor reward to risk situation. However, you might use this technique if you needed a price improvement to achieve your minimum reward to risk ratio before running into a possible area of support.
This is very excellent, you have just changed the way I look at the behaviour of price.
Hey, Michael, thanks for the comment. I’m glad I was able to help you.
Hi Chris
Have you been away? Pmed you few times
Regards
Hey Cedric,
Do you mean on Facebook? I’ve just been busy with other things. I’m running 3 businesses right now (not including my trading). It’s on my list, brother.
No worries, i know you are a busy man 😉